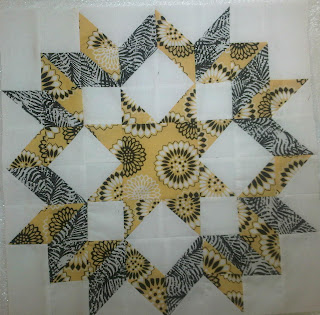
I hope everyone is having a great week-end and for those of
you in Canada....Happy Canada Day!
I am so excited that it is my month to host! Back in January
I found this block online and fell in love with it right away. Since my
quilting skills were quite new I thought it might be too hard for me to make. I also couldn't get away with not making you one to show so I thought maybe it
wasn’t the block for me. Month after month you all have such creative blocks for
me to make for you so I thought..Hey I can do it and I did.
The block I am asking you all to make for me is Cherie’sCarpenter Star.
Cherie has an amazing tutorial on her site http://sewandsoquilts.blogspot.ca/
it's on the left hand side.
The block looks quite complicated, but in the end it just
ends up being 43 HST’s. Now if you are like me and rather hate HST’s and having
to trim them down I give you permission to come to Saskatchewan and kick me.
The block actually comes together quite easily. I think the hardest part is laying
out all of your blocks and then making sure you sew the right ones together. I
spent WAY too much time thinking I was sewing the right blocks together to only
realize they were upside down.
My colour choices for this block are
Background = White
Fabric 1 = any colour you want. Pattern,
solid your choice. (I used yellow)
Fabric 2 = black and white. Any black and white pattern will do.
I am just going to give you all a few pics to show you some info that may make things easier.
When you are sewing the 7" squares together you will get a lovely little X on the back(hard to see in this pic) but it gives you exactly where to cut. If you are printing out the tutorial make sure all the lines Cherie provides show up on the paper, When i printed it the ----- lines didn't show for me.
The 7" squares will give you 4 hst's
I am sure you all know how to trim up HST's use the diagonal line on your square ruler to find the correct size you want and trim the excess. The line up the opposite end and do the same thing
It's okay if there is a lot to trim off. For the HST's 2.75= 2 3/4". I read that wrong and trimmed to 2.78 and then had to retrim....LOL
Making sure everything is layed out correct is key..trust me!
My finished block. Sorry for the wonky picture!
I hope you all have fun making this block. I will be e-mailing my address later today. If you have any questions just let me know!
Hayley


WOW!!! That will be amazing to learn and gorgeous for you to make into a quilt. Thanks for keeping us challenged!
ReplyDeleteJennifer
Thanks Jennifer. I hope you have fun with it :)
DeleteWOW! I love it... I can't wait to pick out my fabrics and start cutting. Thanks so much for the challenge, Hayley...this is going to be a really fun learning one for me!
ReplyDeleteI am glad you like the block. can't wait to see what you come up with
DeleteThanks Hayley! It looks tricky but I'm encouraged by your story and can't wait to make a start :)
ReplyDeleteI thought it was pretty tricky at first too. But in the end it is only hst's. The hardest part is trimming them down and that is only hard since i hate doing that...LOL If you need any help just ask :)
DeleteThis is going to be a fun block! I maybe the only one, but I actually enjoy working with hst's! Thanks Hayley!
ReplyDeletelol if you like working with hst's you must be a little crazy...LOL
DeleteHayley,
ReplyDeleteI'm a bit confused by the tutorial and your instructions, to be honest.
Would the 7" block not give us 8 HSTs?
You mention that there would be 4 hsts from the 7" block, but if I look at Cherie's instructions, she says to draw dotted lines to cut the 7" square in 4 and then 2 additional diagonal lines, and then cut the square first along the dotted lines and then the diagonal, and then I'm assuming you sew a 1/4" seam along each of the triangles, but this would give me 8 hsts?
Please advise.