Tuesday, July 31, 2012

August – Wonky Stripe Block


Hi girls,

What a treat to be inspired and challenged every month via our quilting bee, and now it’s my pleasure to host the month of August.

The inspiration for my collaborative quilt comes from the book The Modern Quilting Bee Block Party by Alissa Haight Carlton and Kristen Lejniek. I love the open-endedness of the design and as I have never made a free form quilt before I thought our quilting bee would be the perfect place to start.

I ask that you create a strip of stripes showcasing a fun mix of floral and geometric patterns, dots, stripes and solids in red, white and aqua pieced together with a simple white background. This block can use up some of your favourite scraps. 

This block is a simple design and I ask that you create 2 different blocks (see variations below).

To give you an idea of the quilt design, here are 3 different blocks together. There won’t be any sashing between the blocks.


Fabrics and colour:

Red, white and aqua (floral and geometric patterns, dots, stripes and solids)
Solid white for background fabric 14" x 14"

Some of the fabrics I chose for my block:


Construction:

Makes 1 finished 13" x 13" block with 1 striped strip.

  1. Cut the 14" white background square into 2 rectangles (of any size).  Cut the fabrics (red, white and aqua) into rectangles that are at least 3 ½" wide and vary in height.


  1. Sew the coloured strips together into a strip that is at least 14" long.

  1. Trim the edges so that they are straight and parallel.

  1. Sew the pieced strip between the white background fabric. Trim the block to 13" x 13".

Variations:

Here are some suggestions to add some variety to the block. And, of course your own creative ideas are welcome too J

2 pieced strips
You can choose to make the block with 2 pieced strips. They can be wider or narrower. Simply cut the white background fabric into 3 rectangles and follow directions above, leaving at least 1 edge of the block white.


Vertical stripes
You can choose to add some vertical stripes to your pieced strip. Also, you might notice that my skinny stripe is narrower than 3 ½". 


What I enjoyed the most was the process of selecting and organising the layout of fabrics, experimenting with the free form style, as well as deciding on the variations between my blocks.

I am looking forward to hearing from you all and seeing what you come up with. 

Hope you’re enjoying balmy summer days and nights in the Northern hemisphere….if you’re away on vacation, enjoy and we will hear from you once you return home and begin quilting again!!

And for our quilters based in Switzerland, bonne fete nationale - 1st August!!

Thank you in advance my fellow quilting bee friends.
Chris

Saturday, July 28, 2012

Katy's Block for Hayley...

Here's my Carpenter Star for you, Hayley...
I hope it fits with all of the other lovely stars posted by the group. This will be a beautiful and colourful quilt, and it looks like you're getting all of the colours of the rainbow!

This was my first time working with HSTs and I did end up getting a square ruler for the cutting phase... I loved how it came together, as I always do with any of the blocks we have done as a quilt collective! I am very happy with the finished product, and there is no question I'm becoming a better sewer and quilter from this experience.

Hope everyone is having a lovely Saturday. I was hoping to get some work done on my own stashes quilt, but one child is sick and the other is needing some attention, so it will have to wait for another weekend. Summer seems to be a hard season to find the time to dedicate to the machine!! You may see it all pieced together sometime in the fall.


Wednesday, July 25, 2012

Quilt for Paw.

My girls have always called their grandfather 'Paw'.  It is an old fashioned Scottish word for father.  It suits him very well and we all use it, all the time.  It was Paw's birthday at the start of this month and I decided to make him a quilt.  Fortunately, Granny and Paw came to visit us this week which gave me a couple of extra weeks to finish the quilt.
The quilt is made from stripy fabrics cut into triangles and then sewn into squares.  I started off by just playing with a couple of stripped fabrics that I had in my stash but soon had to go and buy about 8 more different stripped fabrics.
I took the quilt to Jennifer's house on the evening that I went to have supper with Jennifer and Meg.  I had started a border but it was not right.  Jennifer and Meg suggested a black border with small squares to match the body of the quilt. Great idea, I rushed home and made the new border.
I took this photo in the garden and the sun was too bright so the photo is a bit pale.  I really enjoyed making the border.  I took the quilt top to the shop with me when I went to buy the batting.  The lady in the shop suggested that I put sections of stripy fabric in the binding - another great idea!  Other people designed this quilt for me, all I had to do was show it to someone and they gave me the next step.

Paw loves his quilt and Granny has decided that it is too nice to be kept in the bedroom and that it can live in the living room on a sofa.  She has also decided to redecorate the rest of the room to complement the quilt.
Now I have to get started on Hayley's block.

Linsay.


Love, so far...

I LOVE it ladies! Just got the final square and am so happy with the outcome. I will probably add four of my own squares to make it big enough for the queen bed in our spare room. I cannot wait to see how it all comes together. Thank you!!!

Monday, July 23, 2012

Genevieve's Block

Here it is!  Hope you like it.  I didn't mind doing the HST's, but all the trimming was very time consuming.  I am very interested to see this one come together.  I think it will be quite stunning.
Anyone from the earlier months have their blocks together yet?  I would love to see them.  The rainbow blocks look fabulous!
Genevieve

Sunday, July 22, 2012

Amy (Canada)

And here is mine! These HSTs were very challenging! The Waterloo area group was wondering if it would be better to cut the squares smaller so that you didn't need to trim the HSTs, just cut off the corners. Is this an option, or is trimming just a part of making HSTs? Can't wait to see the final product!

Chris' block for Hayley

Hi girls, here's my block completed....certainly not as defined as the other ones posted but hopefully it will find its place in your quilt Hayley :) I enjoyed making this for you.

Friday, July 20, 2012

Amy (USA)'s block for Hayley and April layout

Hi All!
 Here is the picture of my block for Hayley...it is on the way to it's new home! I  chose a green print and I am really happy with how it turned out. I am one of those weird people who enjoy working with HST's...strange, I know. I really like this block and can't wait to see them all together!

Speaking of blocks all together...I have a picture of all the May blocks together!!! I am so excited about this quilt. As soon as we get settled in the new house, this quilt is going on my design wall and will be first in line for completion! I am using Hoopla by Moda for the backing and binding. I will be adding white strips between all the squares (I think). It should end up roughly twin sized. I love that in all the blocks from everyone, there are only one or two fabrics that I have in my own stash! I am going to play with the layout and am thinking of doing the blocks from lightest to darkest blocks. I made two of the blocks so I would have 12. THANKS SO MUCH LADIES!

                                  Shauna                    Katy                          Amy (Canada)
                                  Genevieve               Micaela                     Hayley
                                  Linsay                     Meg                           Me
                                  Me                           Chris                          Jen


                                                       backing                        binding

Jennifer's Block for Hayley

Wow! This is a beautiful block Hayley, your quilt is going to be dazzling! I enjoyed the process of putting it together. It definitely can be done in stages: cutting, then sewing and ironing, and then the part you need to be rested for...laying it out and sewing it together. That last part took a lot of concentration for me... my brain got a good workout! Thanks for a fun project, I'm putting it in the mail today! Here is a preview:


Tuesday, July 17, 2012

Hi everyone,
I've decided to write a quick post about my block for Hayley so far....whilst I really love my two fabrics side by side, I've come to the realisation that they don't look so effective once cut up into small pieces. My fault for not studying the pattern closer before selecting them. Ahh!! I guess the effect of the large scale print is lost and there's too much white going on....? Before I stop and make a start with new fabrics....I thought I'd share my photos and see what your thoughts are. Do you agree? Oh and by the way, I need to rotate a couple of pairs of triangles around the central square. :)
Chris


Sunday, July 1, 2012

July Block for Hayley


I hope everyone is having a great week-end and for those of you in Canada....Happy Canada Day!

I am so excited that it is my month to host! Back in January I found this block online and fell in love with it right away. Since my quilting skills were quite new I thought it might be too hard for me to make. I also couldn't get away with not making you one to show so I thought maybe it wasn’t the block for me. Month after month you all have such creative blocks for me to make for you so I thought..Hey I can do it and I did.

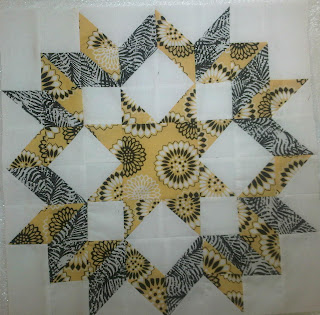
The block I am asking you all to make for me is Cherie’sCarpenter Star.


Cherie has an amazing tutorial on her site http://sewandsoquilts.blogspot.ca/  it's on the left hand side.

The block looks quite complicated, but in the end it just ends up being 43 HST’s. Now if you are like me and rather hate HST’s and having to trim them down I give you permission to come to Saskatchewan and kick me. 

The block actually comes together quite easily. I think the hardest part is laying out all of your blocks and then making sure you sew the right ones together. I spent WAY too much time thinking I was sewing the right blocks together to only realize they were upside down.

My colour choices for this block are

Background = White
Fabric 1 = any colour you want. Pattern, solid your choice.  (I used yellow)
Fabric 2 = black and white. Any black and white pattern will do.

 I am just going to give you all a few pics to show you some info that may make things easier. 

When you are sewing the 7" squares together you will get a lovely little X on the back(hard to see in this pic) but it gives you exactly where to cut. If you are printing out the tutorial make sure all the lines Cherie provides show up on the paper, When i printed it the ----- lines didn't show for me.
The 7" squares will give you 4 hst's


I am sure you all know how to trim up HST's use the diagonal line on your square ruler to find the correct size you want and trim the excess. The line up the opposite end and do the same thing


It's okay if there is a lot to trim off. For the HST's 2.75= 2 3/4". I read that wrong and trimmed to 2.78 and then had to retrim....LOL


Making sure everything is layed out correct is key..trust me!


 When it came time to sew it together. I sewed together all the pairs and then sewed them into blocks of four. I pressed open my seams and I find when I sew in blocks like this my seams match up better.

 I sewed the middle star together then added the sides and then the top and bottom 2 rows 

My finished block. Sorry for the wonky picture!

I hope you all have fun making this block. I will be e-mailing my address later today. If you have any questions just let me know!

Hayley