I love the way that the circles just seem to pop out when you're not looking right at them, and the more you look at the quilt, the more you see! I’ll be asking you to do two slightly different blocks.
For the fabrics,
I chose light greys for the background and darkish pink, orange and a little bit of purple for
the accents. I hope most of you will
have some greys left over from Shauna’s raw edge circles. The colours can be
any pinks, oranges or purples- scrappy is great - and they can be prints, solids, or whatever,
as long as there is enough of a contrast between the light greys and the
colours to let the overall pattern show through once the quilt is assembled.
My apologies - you will need to print out a template, but hopefully at least some of the kinks got worked out last month. Here is the blog post with the link to the template on it, and the direct link to the google document.
Have a look at those links and see if they are working for you,
and let me know you can't access them. The trick again with these printed templates, at
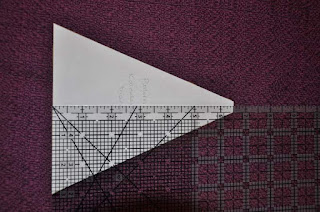
least in North America, is to choose “no scaling” when printing it. The height of the triangle (actually a
parallelogram because of its non-pointy top) when measured from the middle of
the base should be 6.5 inches. Let me
know if you have issues with this – I can print out and send to you if that is
just easier.
I made mine out of thin cardboard
and taped it to my ruler so that one edge of the triangle lined up with the ruler. The taping wouldn’t work quite so well if I was
cutting them out of scraps though.
Cut eight big triangles of your pinks/oranges/purples and eight
greys. If you are doing them in a strip you can cut a 6.5 inch high strip and then
flip the template over after each cut to eliminate wasted fabric.
Then cut eight small grey triangles. You can use the
template for this, or just cut 4.5 inch squares and then cut them in half along
the diagonal.
Lay them out into two blocks so that the colours and greys
are alternating. Then here is where the two slightly different blocks come in. Add small grey triangles to the greys on one block...
and to the colours on the other one.
Having these two different blocks will allow for the cool pattern shown in the first picture to come through.
and to the colours on the other one.
Having these two different blocks will allow for the cool pattern shown in the first picture to come through.
Sew the small triangles to their respective big triangles
and press seams (open seemed to work the best for me, but whatever you are comfortable
with).
Then sew each of those to the triangle that is beside it to create 4 sections. Press seams. Repeat the process to create two halves, and finally sew the block together.
The blocks should end up being 12.5 inches square.
Let me know if you have any questions!


It's 5:30am in Switzerland, 1 November! I was so excited to wake up and check the blog to see our next project, thanks Michaela! Wow! Your quilt is going to be fantastic. I have not seen this block before, such cool illusions when they all get stitched together. It is going to be fun to make. Great color choices too. I will print off the template at work today and let you know if I need you to send me one. Have a great day everyone!
ReplyDeleteJennifer
what a neat block. My heart stopped a bit when I first saw the picture since it looked really hard...but I think it will be easy...hopefully!
ReplyDeleteMy heart stopped a bit too, I thought the first picture was the block! :-)
DeleteJennifer
Fun! Thanks Michaela! I will be glad to play around with the greys I have in my stash and love the idea of using pink, orange and purple together.
ReplyDeleteI did Don't Call Me Betsy's QAL for this quilt and LOVED it! Her directions are fantastic! I made the quilt for my daughter's bed. This will be a beautiful quilt Micaela!
ReplyDelete