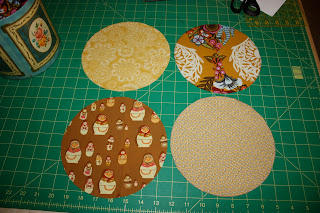
Greetings! I cannot believe it is May already! Bring on the May flowers :)
I have always been drawn to circles and came across this tutorial from Cluck Cluck SEW blog. Why circles? For me, circles represent life cycles, the earth, hugs, tree rings, eggs, a pregnant belly, campfires, swirls and flowers. One of my all time favourite songs about circles is the Circle Game by Joni Mitchell. Have a listen while you read the rest of this tutorial :) Why raw edge? I love the freedom this represents and how it seems to bend the rules of traditional quilting.
 |
| Just to show you my thinking process :) |
1. Trace and cut 4 circles (19cmx19cm). I will send you a PDF file to print off via email. I used a disappearing fabric marker to do this.
2. Cut gray squares. Cut squares 13 1/2 by 13 1/2 inches. Two of the gray fabrics I used were cut from mens dress shirts that I found at a local thrift store. Just an idea :)
3. Iron the circles and squares into 4's, to find the centre. Press.
4. Pin centre of circle to centre of square. Then, pin each side where the lines meet. I also used some fabric glue, to help hold the fabric steady (optional).
5. Sew circle onto square. Go slow and smooth out fabric as you sew, making sure your creases match. Use aprox. 1/8th of an inch seam allowance (just eye it up!). I used yellow/mustard thread. You can use white or match some thread to your fabric, either is just fine with me.
6. Press and cut. Press fabric gently but keep the pressed lines visible in order to know where to cut. Lay your ruler on the pressed line and cut.
7. Remove the grey fabric from behind the circle (less bulk for when it will be quilted). I used pinking sheers but regular scissors are fine too.
PS - DO NOT cut the coloured fabric like I did :) Honestly!
 |
| OOOPS :) |
9. Sew blocks together using 1/4 inch seam allowance. I started at the centre of the circle and worked out, pinning the two squares where the edges of the circles meet. Then ironed the seams in opposite directions so that the points would technically meet :). Finally, I pinned the centres of the circles together, then the edges of the circles.


10. Admire your creative piece of work :) Do not sew the four blocks together. I want to "scatter" them around when I arrange the blocks for the finished quilt. Could you also send me a 3X3 inch block of each of your fabrics? I might use them to do something funky with the final project. I was thinking I might sew small circles in the centre of each circle or join the corners of each block with a coloured circle. See my thinking below :) Hmmmm. Hope you enjoy sewing this. Let me know if you have any questions. Happy May. Shauna :)


This is going to be a great quilt! And I admit, circles and curves have always frightened me so this will give me an opportunity to overcome that fear! And I see some fabric shopping in my future (yippee!!!) for more gray fabrics! I will have to give a good look at my fabrics to decide which focus color I will use. Great job on the tutorial Shauna!
ReplyDeleteAmy (USA)
Lovely block choice Shauna. I find myself looking forward to the start of each month. I love the anticipation of each new block. The examples that you posted are very nice and I particularly like the quilt with the leaves on it. The grey background is very effective, the grey highlights the rainbow colours perfectly. I can understand why you want to achieve this look.
ReplyDeleteYour tutorial is very clear. I like the diagram where you have cut out the circle instead of the background. I do that kind of thing too, doesn't it make you feel silly when things like that happen?
Linsay.
Fun! I have been doing a bit of shopping online and have decided on red circles. The hard part will be waiting for the fabric to arrive so I can get started!
ReplyDeleteJennifer
The tutorial was great Shauna! I made my squares with no problems at all! I was slightly nervous about doing circles too, but this method was a great introduction.
ReplyDeleteLooking forward to seeing the rainbow of colours people choose.
Genevieve
eek circles are scary especially since I have only been quilting for not quite a year !! LOL Great tutorial though I think I may have to take a few deep breaths and a few sips of wine before starting this one. Thank you for the challenge :)
ReplyDeleteMrs. Pickles - I am sure you will find that once you get going it will be a easier than you think. But wine is always a good option :) Hope you enjoy! What colour are you thinking of?
ReplyDeleteThanks Shauna. The second time reading through your tutorial things seemed a little easier.Now to get started on the blocks! I think I am going to do with Blue since I love BLUE..lol
ReplyDeleteHayley