Thursday, January 31, 2013

February is for SPIDERS!


My choice this month is the traditional Spiderweb! I love how bright modern fabrics make this traditional pattern look fresh and beautiful. My inspiration is this photo:

Photo from Sunny in Cal: 
http://www.sunnyincal.com/2011/11/spiderwebs-my-way.html

I love how her vibrant fabrics pop against each other, and that the white stars allow your eyes to rest. I cannot wait to see what you create!

I'm asking for two full squares, (they'll each have a four-pointed star in the middle.)

For the tutorial, I used one from alamode: http://alamodefabric.blogspot.ca/2010/06/spider-web-quilt-block-tutorial.html
with some tweaks. (Some on purpose, some accidental!) Here are the changes:


HINT: When drawing the lines to start your strips, instead of measuring 6" from the bottom corner, I measured 3" from the top point down on each side. This way, if your triangles aren't perfect, it won't affect the size of the diamond that is exposed on your final square.

The second is that instead of having the lines go to the bottom of the triangle, mine go to the 1/4" mark as shown below.


 For the print fabrics, here are some guidelines:

Please don't choose fabrics with a lot of white in them (or black and white).
Modern fabrics over traditional fabrics.
I like bright and vibrant fabrics. Please don't use pastels (a couple here and there is okay).
Here are my samples.

For the white fabric, I used Kona Snow. You don't have to use the same fabric, but please choose a bright white. The variation in white fabrics will add some texture and depth.

Pointers:

Use a sharp, washable, light-colored writing utencil to make your marks on your  triangles.
Your strips do not have to be very long.
When you are pressing the triangles, just push down on your iron, don't pull or stretch the fabric.
Please don't have any fabrics touching as this creates a new kind of line, although it is fine if you repeat some of fabrics here and there. 

Let me know if you have any questions!
Thank you!!!!


Monday, January 28, 2013

Chris' blocks for Jennifer


What a great way to start the year, the thought of snowflakes and a winter themed quilt... such a contrast to our hot, hot summer here in Western Australia. Thank you Jennifer, I enjoyed making these for you. I must admit the Party Hats pattern (second picture) was chosen cos it looked nice and simple :). I'm happy with the effect...and am loving your olive green dots!! I look forward to seeing more snowflakes.

And, just for fun, and to add some warmth to your winter....here's where we spent our recent summer holiday.


Charity Quilt 2012


Hi everyone, I am finally posting my blocks for last year's charity quilt. I had lots of fun experimenting with the colours and pattern. In the end, I created a block of my own design, yes, believe it or not (the second picture). Or perhaps, it already exists? Anyhow, I just changed the layout of my first block to what I think is a more appealing design. Amy Butler and Prints Charming... and I'm happy! And of course, loving the thought that our quilt will end up in New Mexico keeping someone in need nice and warm. Thanks to Jennifer's mom and her quilting group :)

Saturday, January 26, 2013

Anthea's blocks for Jennifer

After feeling incredibly daunted by this project - all those little triangles, all those little squares, all those tricky joins, I am now feeling pretty pleased with myself - my first ever blocks.  I hope they are ok for you Jennifer.  It was lots of fun and I am tempted to continue making more and more.  Obviously a sign that I had better gets stuck into a project of my own.

I cut the first one (Star within a Star) out with Chris one evening and I can see why patchwork can be a sociable hobby.  The bottom star in the photo below is the Morning Star.


I confess to unpicking the first attempt at Star within a Star to try and fix some truncations of the little black triangles and misalignment of the red corners.  It is still not perfect and I have now a sincere respect for those that can connect the various shapes perfectly at neat junctions.

For the next block I tried to choose a block where I could use all of the fabrics you sent me Jennifer and so I chose the Morning Star (below).  Practice really does make progress as there was no ripping this time and I think it has turned out fairly reasonably.

Thanks heaps for letting me join in all your fun everyone. I'm looking forward to the next one now.

Thursday, January 24, 2013

Help Please :)


Hello from sunny, cold Canada! Funny timing to all of this :) I logged onto our site this morning and was greeted with a similar request from Amy (do great minds think alike or what?). Last week I trimmed each square to 9.5inch blocks so that I could turn each on point. The original blocks were much larger. But I really like the effect of having less gray. The circles really seem to pop this way :) In the top photo you can see the pieces of grey I cut off of each square. I am going to piece these together to make a border for the quilt. I am also hopping to use the 4 green circles from Katy as the "corner stones" of the quilt. :) I have been experimenting with different arrangements of our raw edge circle quilt. I cannot decide which arrangement to sew together. What is your vote? My plan is to fill in the spaces on the edge with different greys. Then frame the whole thing with a thin border before adding on a larger border. Thoughts. Suggestions....Thanks in advance. 

Wednesday, January 23, 2013

Your input, please!

Hello ladies. As I mentioned, I'm working on a quilt for myself. I finished the squares and have two questions for you guys. Firstly, do I arrange them organized by color (first photo), or randomly (second photo), or organize them in another way? I used most of my fabrics in my cabinet, so they are totally varied.
Secondly, this is for our queen bed. The quilt is meant for a full. I was thinking of finishing the top the way it is meant to be (I'll add white rectangles on the sides to even the edges), and then I was going to add larger white rectangles to make it large enough. The crosses will pretty much be only on the top of the bed, and the white part will be hanging off the sides. Otherwise, I could make more crosses and have the entire quilt be crosses.... Help!


Amy (Canada)

Sunday, January 20, 2013

Quilting on a snowy day in Canada

I just had to share this view! I'm working on a quilt for myself, and am enjoying the beautiful soft snow fall. Peaceful. I just heard our baby wake up, so it looks like this time is over for today, but it was lovely while it lasted!

Amy (Canada)

Thursday, January 17, 2013

Linsay's Blocks for Jennifer

Hello Everyone! Linsay had trouble posting photos of her January blocks (see her post below). It seems to be working on my computer, please let me know if any of the rest of you have problems.

Here are Linsay's lovely blocks, they arrived in the mail today.


Linsay, I was secretly hoping that you would pick the blocks that required templates (or paper piecing) since you are such an expert... and my wish came true! Thank you!! :-)

Just a little reminder to everyone to feel free to add your comments to the "Bee Buzz" question of the month...What is your favorite book and/or what are you reading right now?

It is c o l d in Switzerland right now, a perfect time to be making a winter themed quilt. Looking forward to seeing more posts in the last two weeks of January.

xoJennifer

Jennifer's winter blocks

I posted Jennifer's blocks yesterday.  It was a very cold and snowy day and it felt like the perfect weather for a winter quilt.  I took some photos of the blocks before I popped them in the post but now I cannot upload the photos onto the blog.  I used to just click on 'insert photo' and then choose the photo that I had stored on my computer.  Now that option doesn't seem available to me.  Am I doing something wrong?
The blocks were fun to make.  I had a very happy sewing Saturday last weekend while Calum and Flora were skiing and Arabella was studying for exams.  The dog was the only one who needed some attention.  I tried to take him for a walk but we had to cut it short when his paws got too cold.  He is a very wimpy dog.  He was holding one paw in the air at a time and looking very pathetic.  He was much happier when we got home and he got tucked in under his dog quilt. (yes, I made him his own quilt).  I'll post a photo of it when I manage to master this technology.

Linsay.

Sunday, January 6, 2013

Sunday Snowmen

Today is the first day in quite a while that I spent any time in my sewing studio, and it felt great!!  First thing I picked up was Jennifer's fabrics (newbie to the Bee needs to make a good impression, right?!) I had fun sewing these and I totally fell for the little snowmen on this fabric while I did (read: may need to order some more for my stash!)  The blocks are 12.5" square, despite how they photographed! :-p

I chose the Aunt Dinah block, because it looked so much like a snowflake to me, and the Northumberland Star, a long time favorite of mine.  Jennifer, this is going to be such a fun quilt!

I'm looking forward to sewing with all of you this year.  I belong to the same MQG that Amy (U.S.) recently joined, and I had the pleasure of seeing, in person, her beautiful Octagonal Orb quilt that you all helped her make last year--it's fabulous!

Happy New Year,

Doris
www.madebyabrunnette.com

Thursday, January 3, 2013

Sick Day!

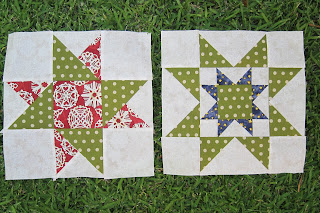
I had big plans for today. I had a list of errands, the girls were all booked in at the daycare at the gym, and then... Evie got sick! Plans canceled. Instead of waking up to a sick child, I was awoken with "who let the dogs out" at the top of her lungs... So, we had a day in, the girls played nicely, the baby napped as she was supposed to, and I finished my January/Charity blocks! For the charity blocks, (I admit, I went for the easy ones), I chose to repeat the square I did for the previous charity quilt. I loved how the solids and print boldly played off of each other. I used all prints this time, and varied the black and white fabric (I didn't have enough of the bold polka dot, but I really like how it turned out- the polka dots seem to draw your eye to the center and the corners, and the softer black and white allow yours eyes to rest). I also varied the blue fabric in the second square, also due to lack of yardage, but I think it makes what could be a boring square into one a bit more interesting. And on to Jennifer's squares... I really like how they turned out! I wasn't sure, but I think I chose the right prints for each part. I think the boldness of the red in the first one stands out even with the brightness of the green. I like how the white allows the red and blue to pop. And... I am rather impressed with how neat MOST of my corners are. This past year has really trained me to more of a perfectionist (notice how I say more of one...) and it has really helped me visualize how to arrange my fabrics. A great start to this year of quilting!!!

Amy (Canada)