Wednesday, October 31, 2012

Micaela's block for November - Kaleidoscope

Happy Halloween everyone! It's hard to believe it is November tomorrow.

 This month we are doing kaleidoscopes. My inspiration was this quilt from Kitchen Table Quilting
 

I love the way that the circles just seem to pop out when you're not looking right at them, and the more you look at the quilt, the more you see! I’ll be asking you to do two slightly different blocks.
I followed the directions from the Kaleidoscope Quilt-along on the blog Don’t call me Betsy. It’s a great site - go on over and check it out!

For the fabrics, I chose light greys for the background and darkish pink, orange and a little bit of purple for the accents.  I hope most of you will have some greys left over from Shauna’s raw edge circles. The colours can be any pinks, oranges or purples- scrappy is great -  and they can be prints, solids, or whatever, as long as there is enough of a contrast between the light greys and the colours to let the overall pattern show through once the quilt is assembled.
 

My apologies - you will need to print out a template, but hopefully at least some of the kinks got worked out last month. Here is the blog post with the link to the template on it, and the direct link to the google document.

Have a look at those links and see if they are working for you, and let me know you can't access them. The trick again with these printed templates, at 
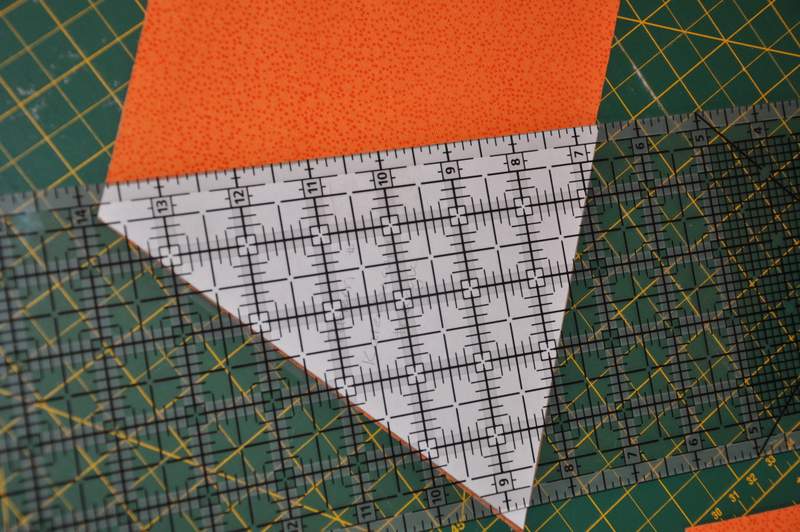
least in North America, is to choose “no scaling” when printing it.  The height of the triangle (actually a parallelogram because of its non-pointy top) when measured from the middle of the base should be 6.5 inches.  Let me know if you have issues with this – I can print out and send to you if that is just easier.

I made mine out of thin cardboard and taped it to my ruler so that one edge of the triangle lined up with the ruler. The taping wouldn’t work quite so well if I was cutting them out of scraps though.

Cut eight big triangles of your pinks/oranges/purples and eight greys. If you are doing them in a strip you can cut a 6.5 inch high strip and then flip the template over after each cut to eliminate wasted fabric.


Then cut eight small grey triangles. You can use the template for this, or just cut 4.5 inch squares and then cut them in half along the diagonal.


Lay them out into two blocks so that the colours and greys are alternating. Then here is where the two slightly different blocks come in. Add small grey triangles to the greys on one block...


and to the colours on the other one.


Having these two different blocks will allow for the cool pattern shown in the first picture to come through.

Sew the small triangles to their respective big triangles and press seams (open seemed to work the best for me, but whatever you are comfortable with). 

 
Then sew each of those to the triangle that is beside it to create 4 sections.  Press seams. Repeat the process to create two halves, and finally sew the block together.
 
 
The blocks should end up being  12.5 inches square.

Let me know if you have any questions!

 
Hi everyone!
I'm hoping my hexagons will find a place in your quilt Genevieve...and that my stitching doesn't stand out too much. I must admit I was sooo grateful to read about Meg's early experiences with paper piecing. I definitely need more time to develop my skills :) I enjoyed exploring flannel and particularly love Nani Iro's 'brushed cotton' (fabric with the random small pink flowers).


Monday, October 29, 2012

Question for Genevieve

Hello!
Unfortunately I am still having difficulty printing off the template...ugh. I also realized that I do not have your address! I am planning to try a few different ways to print off the templates again and may just make them like Meg described. So sorry they will probably be a few days late. We are having MAJOR difficulties with the home we moved into in July and have been tied up with contractor after contractor and now an attorney. I will get the hexagons done and sent to you as quickly as possible! Thank you for understanding!
Amy (USA)

Thursday, October 25, 2012

International Stashes Meeting: Switzerland

Today was such a fun day! I met up with Linsay this morning and she kindly gave me a hands-on tutorial on sewing together hexagons. We enjoyed a nice cup of tea and the view from her dining room table as we worked:

Her adorable doggie kept us company:

Then I came home and finished. I thought I would like working this way, and now I can say I love it! Genevieve, thanks for introducing me (us) to hexagons and hand stitching! I will have your pieces in the mail tomorrow:

While at Linsay's I got to know more about our lovely bee member. I'm sure she would be too humble to share, so I will brag on her a bit. She is making 22 lined vests (!!!!) for the band at the school of  her daughters. They will be used for a holiday program:

Lindsay has so many beautiful quilted pieces around her home, each one has a wonderful story behind it. This piece I just loved...she made it while living in Australia. The picture does not do it justice, there are so many fabrics, techniques, and other little bits to study and enjoy:

I also got to take a sneak peek at the blocks that we all made for Linsay in September. They are vibrant together and I know Linsay will add her magic touch and have another unique quilt to add to her collection.
Thanks Linsay for a great day!
Jennifer

PS: Book Recommendation
My Hega-go-go book arrived! If you have enjoyed sitting and sewing together hexagons, 
this book is full of fresh and fun new ideas!
Hexa go go
by 

 Tacha Bruecher


Monday, October 22, 2012

Hexagons for Genevieve

Here they are! I enjoyed learning how to do these hexagons. It was especially helpful that Genevieve could give us Waterloo girls a tutorial in person. I was able to stitch these hex's together and play with my kids at the same time. This would be a fun way to use up scraps and a great project to take on the road. Hmmm. Thanks Genevieve. Hope you enjoy.   Shauna :)

Wednesday, October 17, 2012

Waterloo Hex Night!

A few snapshots of the local Waterloo-area girls from International Stashes getting together last night to try our hands at flannel hexagons!! We were lucky enough to have Genevieve in person, so she helped guide us and teach us...and I think we all have the hang of it now. Proof of that? I'm watching tv and hand stitching the rest of my hexagons!


Tuesday, October 16, 2012

Meg's Block for Genevieve

Hi Everybody!

I had a lot of fun putting Genevieve's block together.  As I posted earlier in a comment, the first time I tried English paper piecing, I really did not like it.  Way too fiddly and (the real reason, even though I hate to admit this about myself) -- too hard to make perfect!  The second project was tolerable -- and by the end of it, I grudgingly admitted that I had gained a new skill.  This third time, I loved it, and found it absolutely true that I could sit in front of the TV and zip those hexagons together:)


Finally, I had a lot of fun with the flannel, which I previously hadn't used.  I will say that the colours are much more vibrant than they appear here -- and the solid-looking bits have a small print to them.  Although this block looks a bit 'cool', I remember lots of warm bursts in the original photo, so hopefully it will be a nice balance.

Can't wait to see the other blocks, and good luck to everybody who's trying this out for the first time.  xo Meg

Friday, October 12, 2012

Hand stitching...

Hi everyone,
I've sewn together some of my hexagons but was suspicious my stitching was too loose. I took them to my local quilting shop and the lady kindly told me to sew my stitches closer together and pull them tighter. Has anyone found a helpful video regarding slip stitch, or is it a skill I will improve with practise?!!
Happy sewing and weekend!

Monday, October 8, 2012

Hexagon Help Needed!

Hi everybody --

I have been trying to print the hexagon template for the October block and I'm not having much luck getting the right size.  My printed hexagons are 4.5" across.  The label to the template says "2.5 inch hexagon" -- but the sides are only about 2 and 3/8".

Anybody having any luck yet?  I could get out my son's geometry set soon and draw my own -- but given that they need to fit with other blocks, I'd feel much better using a template that everyone else is using.

Please post if you have any solutions.  Thanks!  Meg

Wednesday, October 3, 2012

Catching Up


 Hello Hello! I am back at my machine and excited to share my two new blocks. Linsay and Chris, thanks for your patience.

The snowballs came together quite nicely. The top left fabric was leftover from a dress I made for Megan when she was 2. The bottom right owl fabric came from a pair of boxers. The middle green and blue fabric was a piece from Katy (thank you) and I noticed that Katy and I have included the same fabric (this was not planned). Can you find it? The middle right fabric came from a quilt I made for a girlfriend when she got married around 14 years ago. Hope you enjoy, Linsay :)

I loved the freedom of putting these two blocks together. I love "freeform sewing".  I had all the reds in my stash and thanks to Micaela acquired some lovely aquas to match. The lighter blue an old fabric that I received from my neighbours mothers stash. This blue is one of my favourites and shows up in a lot of random projects of mine. Hope you enjoy, Chris :)

Monday, October 1, 2012

February blocks coming together...

Girls! Here's a peek at the February quilt top coming together. I ran out of white, so am waiting to finish three of the edges, and I need more of my backing fabric, but it is slowly taking shape! I will machine quilt this one...stitching in the ditch along the block edges to start, and then I saw a really neat design that looks like 'half moons' in each of the small blocks within blocks. We'll see how well the machine sewing goes, and how much stamina I have. Amy and I met yesterday at our local quilting shop (um...that is a generous word to describe the store... it is a hodgepodge of weird offerings and odd deals, and a huge selection of fabric at the back of the warehouse). We decided on a polyester batting but now I'm waffling and wonder if I should splurge on the 'quilter's dream'... I've used warm and natural before for all of my flannel quilts and know it sews really smoothly. I will let you know what I end up doing!

So, here's the top! My 'design wall' is the bookshelf in our family room...

And here's the backing fabric... It is from the 'piece o cake' line from Robert Kaufman, and has a very vintage 50s feel to it. I love the yellow and blue on white. The quilt feels like it will be at home in a cottage bedroom. Fresh and cheerful and smelling like summer.


And now for your advice, what do you think would look good as the binding? I was leaning towards a bright blue to match the blue in the back. Solid? Striped? I welcome your artistic ideas.